> ## Documentation Index
> Fetch the complete documentation index at: https://sentiment-docs.arhamwebworks.com/llms.txt
> Use this file to discover all available pages before exploring further.
# Header
The **Header** is the first element customers see when they visit your store. In the Sentiment theme, the header is designed to be minimal yet powerful — featuring your logo, navigation menu, account link, and bag icon, all within a sleek bar that sits at the top of every page. You can configure navigation style, sticky behavior, transparency, and a full mega menu to create a rich browsing experience tailored to your jewelry brand.
 ### How to Configure the Header
* From your Shopify admin, go to **Online Store → Themes**.
* Click **Customize** on the Sentiment theme.
* In the Theme Editor, select the **Header** section from the left sidebar.
* Adjust the settings according to your preferences.
* Click **Save** to apply your changes.
### Header Settings
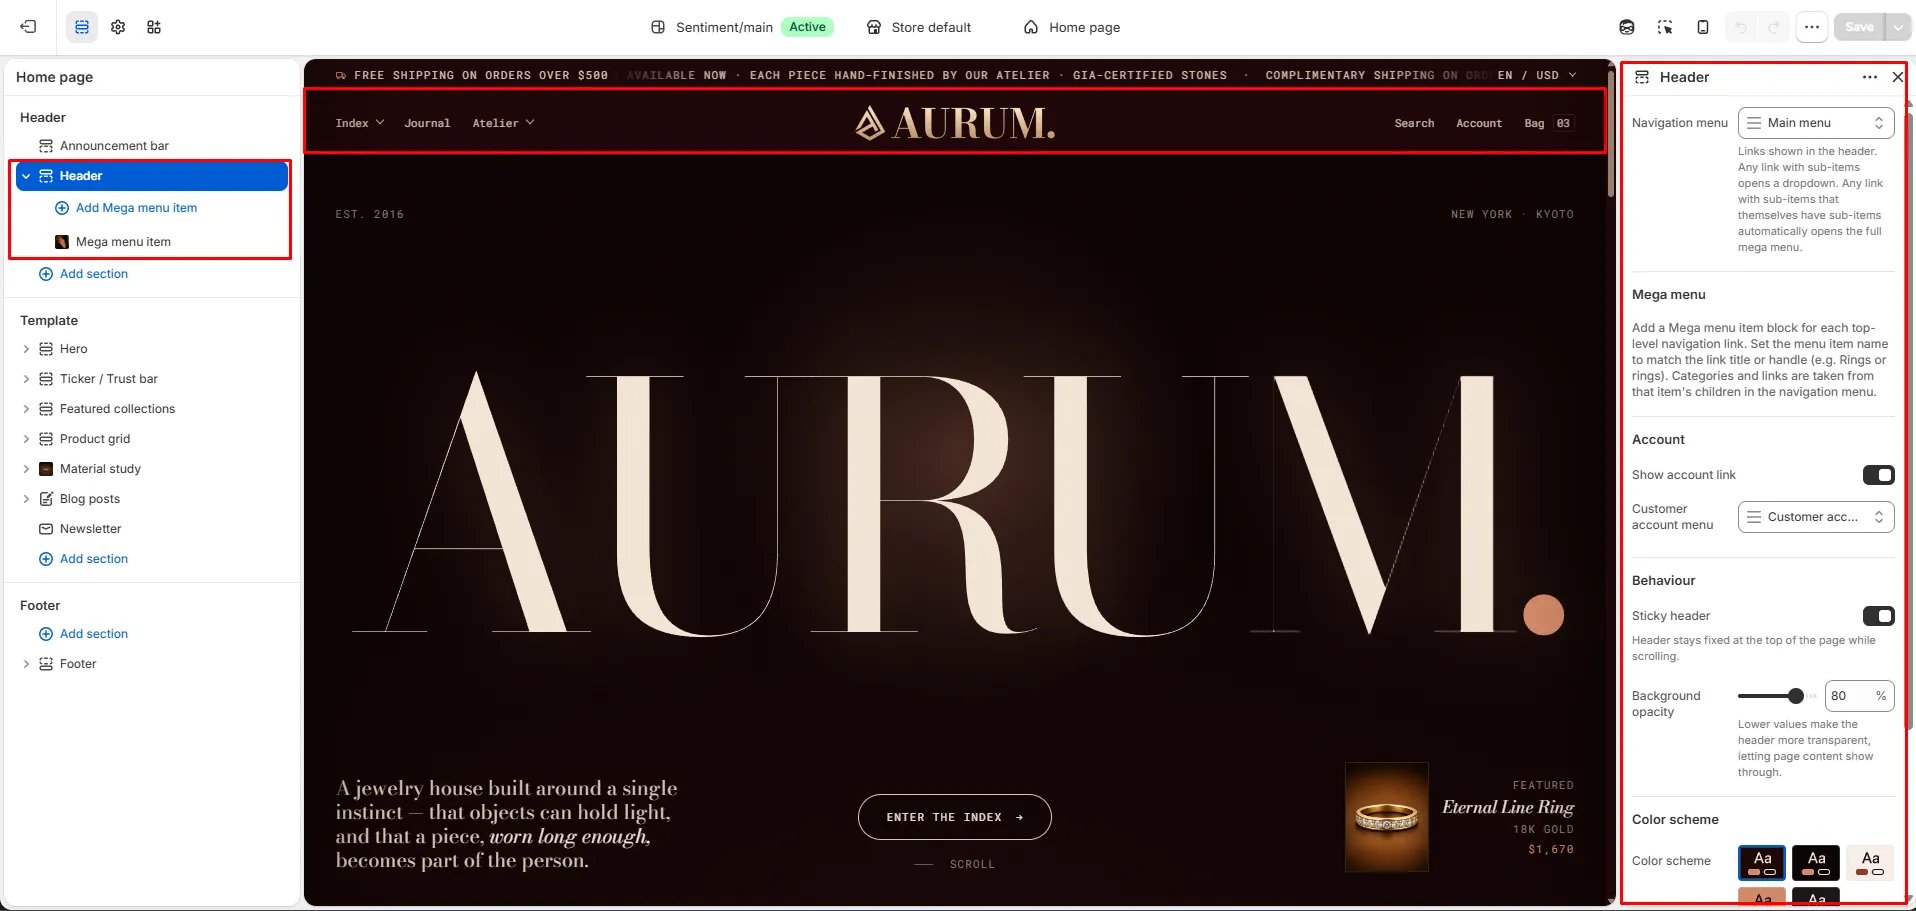
* **Navigation menu:** Select the menu to display in the header. Any link with sub-items automatically opens a dropdown. Any link with sub-items that themselves have sub-items automatically opens the full mega menu.
* **Show account link:** Toggle this on to display an account icon in the header, allowing customers to log in or access their account directly.
* **Customer account menu:** Select the menu to use for customer account navigation links.
* **Sticky header:** When enabled, the header remains fixed at the top of the page as customers scroll, keeping navigation always accessible.
* **Background opacity:** Control how transparent the header background appears. Lower values make the header more see-through, letting page content show through beneath it. A value of 80% provides a slightly translucent look while keeping text legible.
* **Color scheme:** Choose from your store's defined color schemes to set the header's background and text colors.
***
### Setting Up Navigation Menus
### How to Configure the Header
* From your Shopify admin, go to **Online Store → Themes**.
* Click **Customize** on the Sentiment theme.
* In the Theme Editor, select the **Header** section from the left sidebar.
* Adjust the settings according to your preferences.
* Click **Save** to apply your changes.
### Header Settings
* **Navigation menu:** Select the menu to display in the header. Any link with sub-items automatically opens a dropdown. Any link with sub-items that themselves have sub-items automatically opens the full mega menu.
* **Show account link:** Toggle this on to display an account icon in the header, allowing customers to log in or access their account directly.
* **Customer account menu:** Select the menu to use for customer account navigation links.
* **Sticky header:** When enabled, the header remains fixed at the top of the page as customers scroll, keeping navigation always accessible.
* **Background opacity:** Control how transparent the header background appears. Lower values make the header more see-through, letting page content show through beneath it. A value of 80% provides a slightly translucent look while keeping text legible.
* **Color scheme:** Choose from your store's defined color schemes to set the header's background and text colors.
***
### Setting Up Navigation Menus
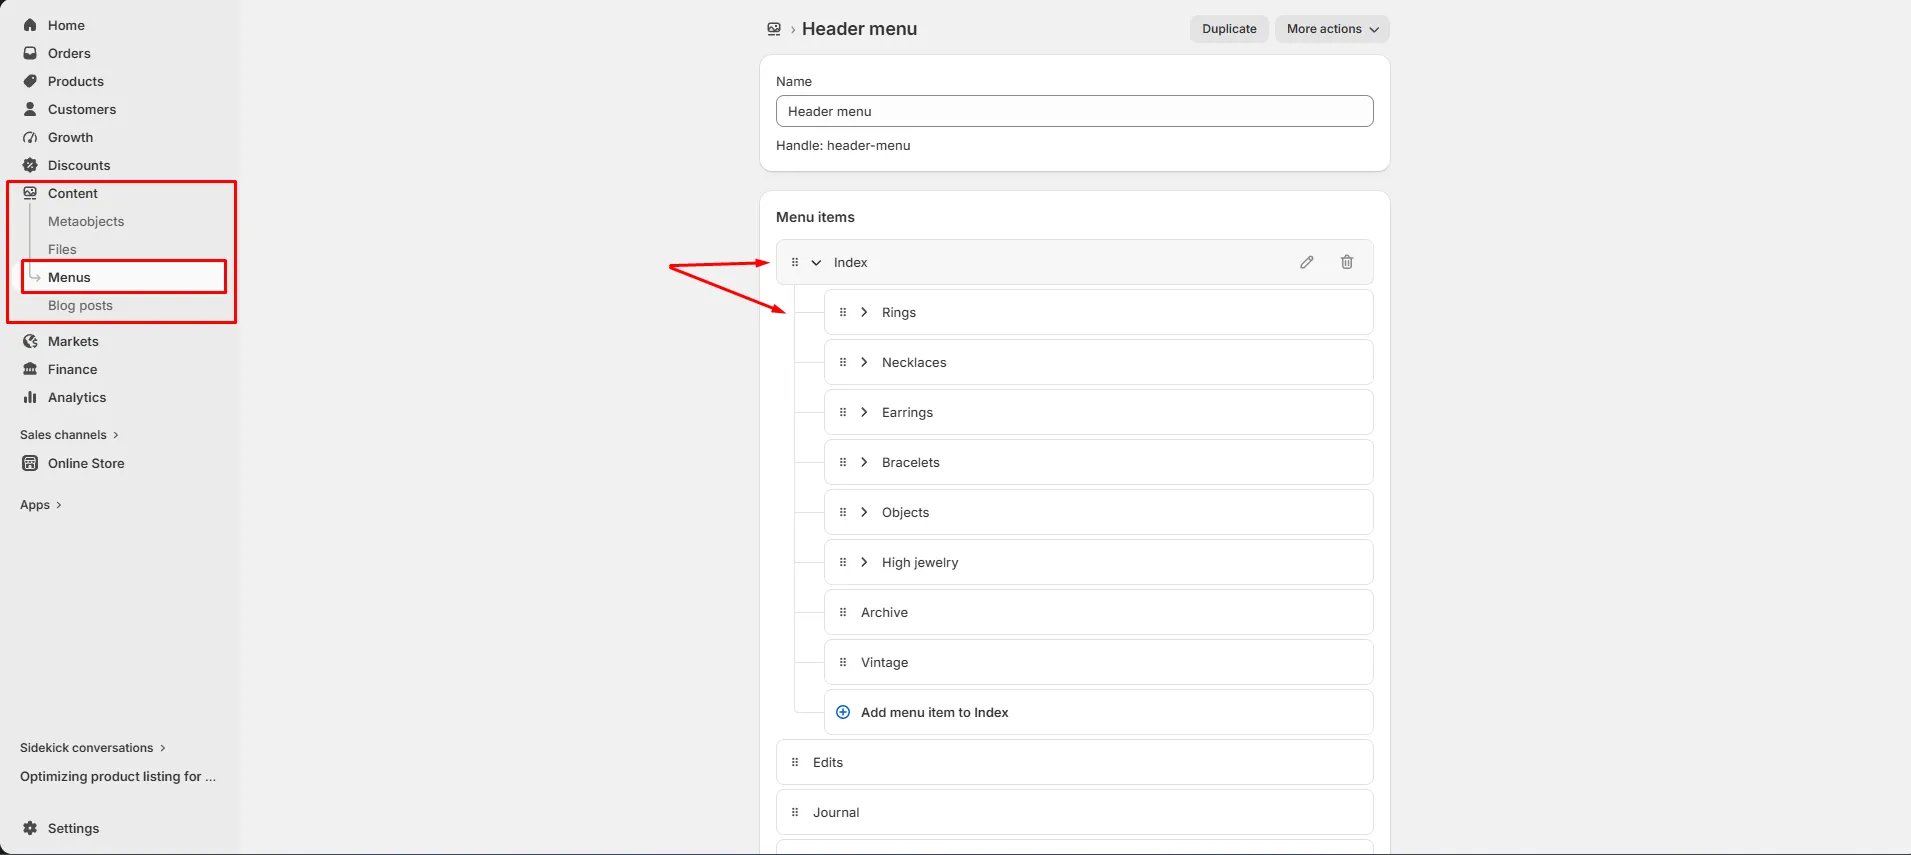 The header's navigation is powered by menus you create in your Shopify Admin. You can use standard dropdown menus for simple navigation, or set up a full mega menu for stores with deep category structures.
#### How to Create Your Navigation Menu
1. In your Shopify Admin, go to **Content → Menus**.
2. Click on your **Header menu** (or create a new one).
3. Add your top-level menu items (e.g., Rings, Necklaces, Earrings).
4. To create a dropdown, nest sub-items beneath a parent item by dragging them slightly to the right using the handle icon (⠿).
5. To trigger the full mega menu, add sub-items to those nested items as well — any link with two levels of nesting automatically opens the mega menu in the theme.
6. Click **Save menu**.
The header's navigation is powered by menus you create in your Shopify Admin. You can use standard dropdown menus for simple navigation, or set up a full mega menu for stores with deep category structures.
#### How to Create Your Navigation Menu
1. In your Shopify Admin, go to **Content → Menus**.
2. Click on your **Header menu** (or create a new one).
3. Add your top-level menu items (e.g., Rings, Necklaces, Earrings).
4. To create a dropdown, nest sub-items beneath a parent item by dragging them slightly to the right using the handle icon (⠿).
5. To trigger the full mega menu, add sub-items to those nested items as well — any link with two levels of nesting automatically opens the mega menu in the theme.
6. Click **Save menu**.
 #### How the Navigation Renders
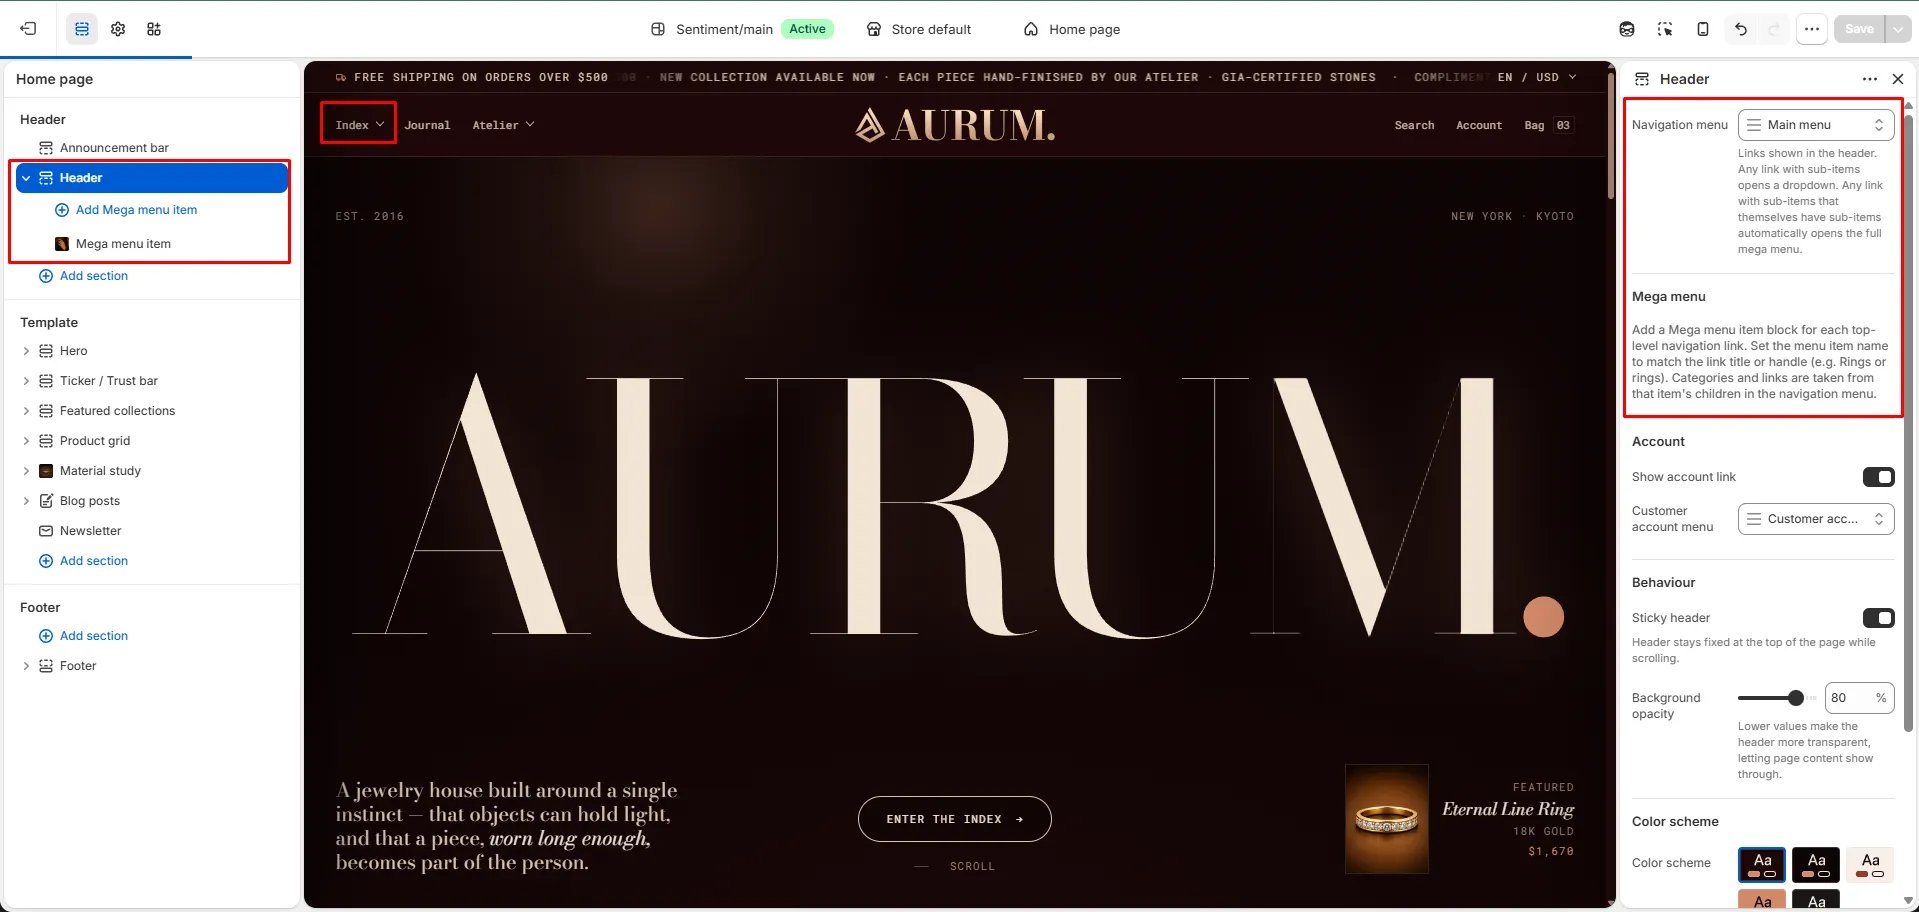
* A top-level link with **no sub-items** renders as a plain link.
* A top-level link with **one level of sub-items** renders as a standard dropdown.
* A top-level link with **sub-items that themselves have sub-items** automatically renders as the full **mega menu**.
#### How the Navigation Renders
* A top-level link with **no sub-items** renders as a plain link.
* A top-level link with **one level of sub-items** renders as a standard dropdown.
* A top-level link with **sub-items that themselves have sub-items** automatically renders as the full **mega menu**.
 ***
### Mega Menu
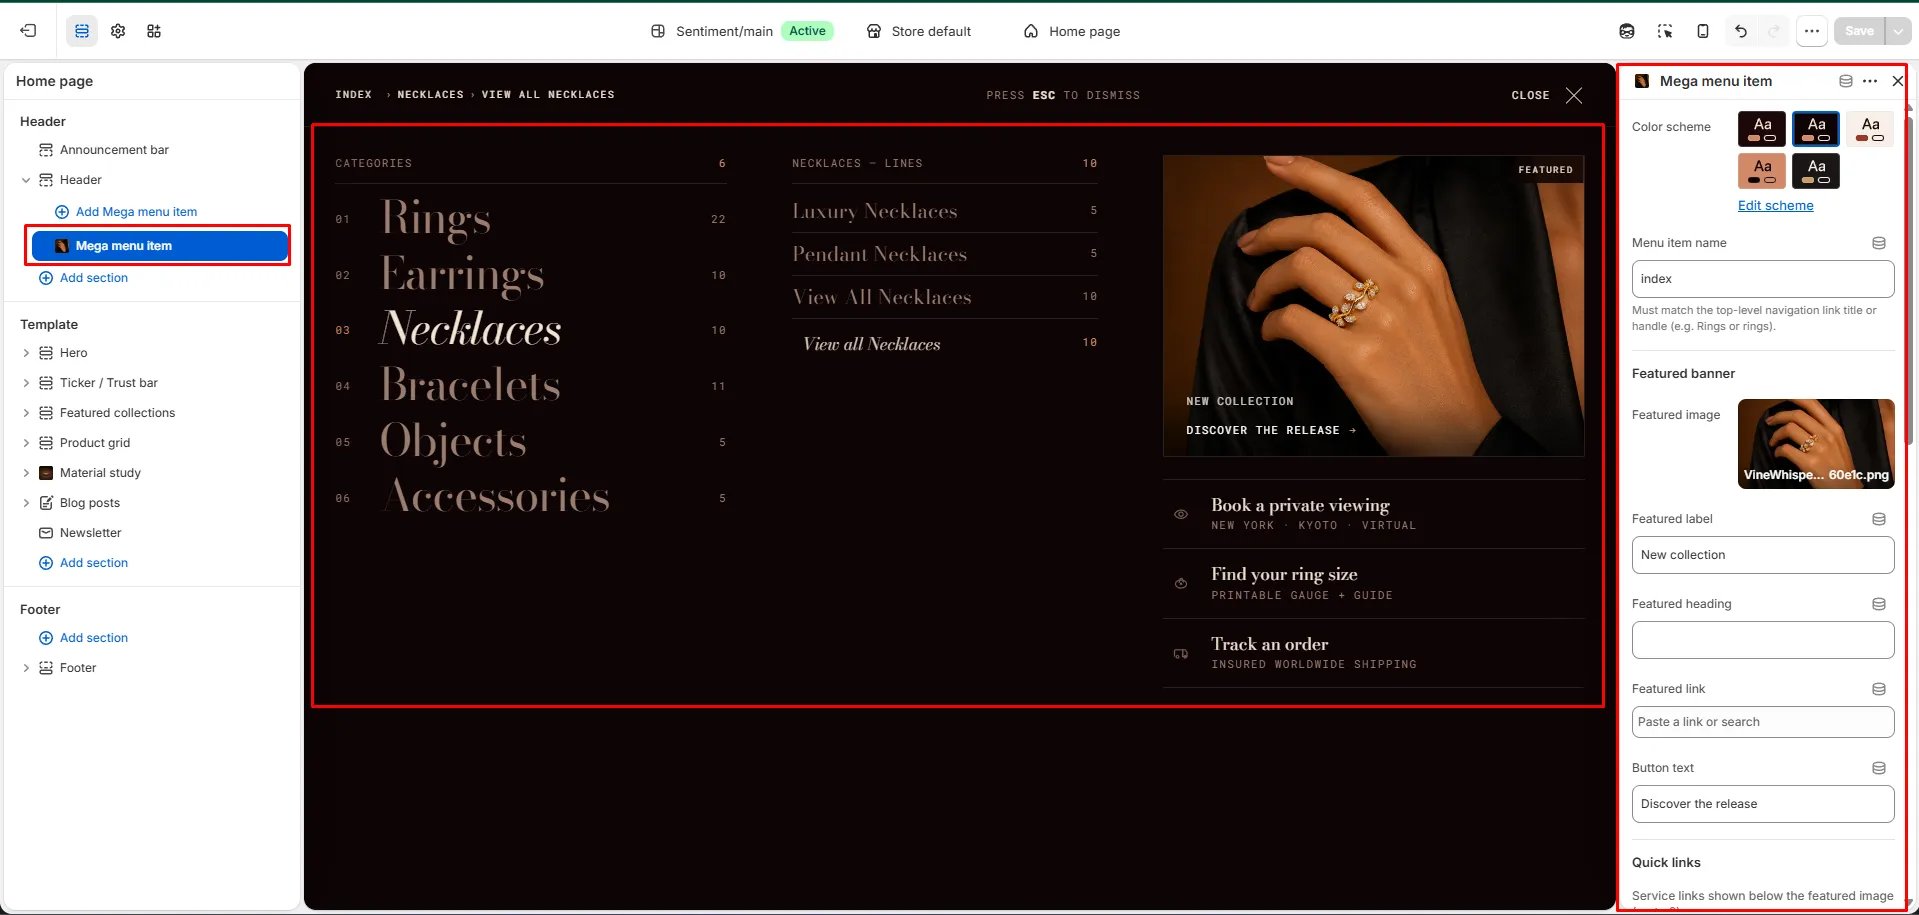
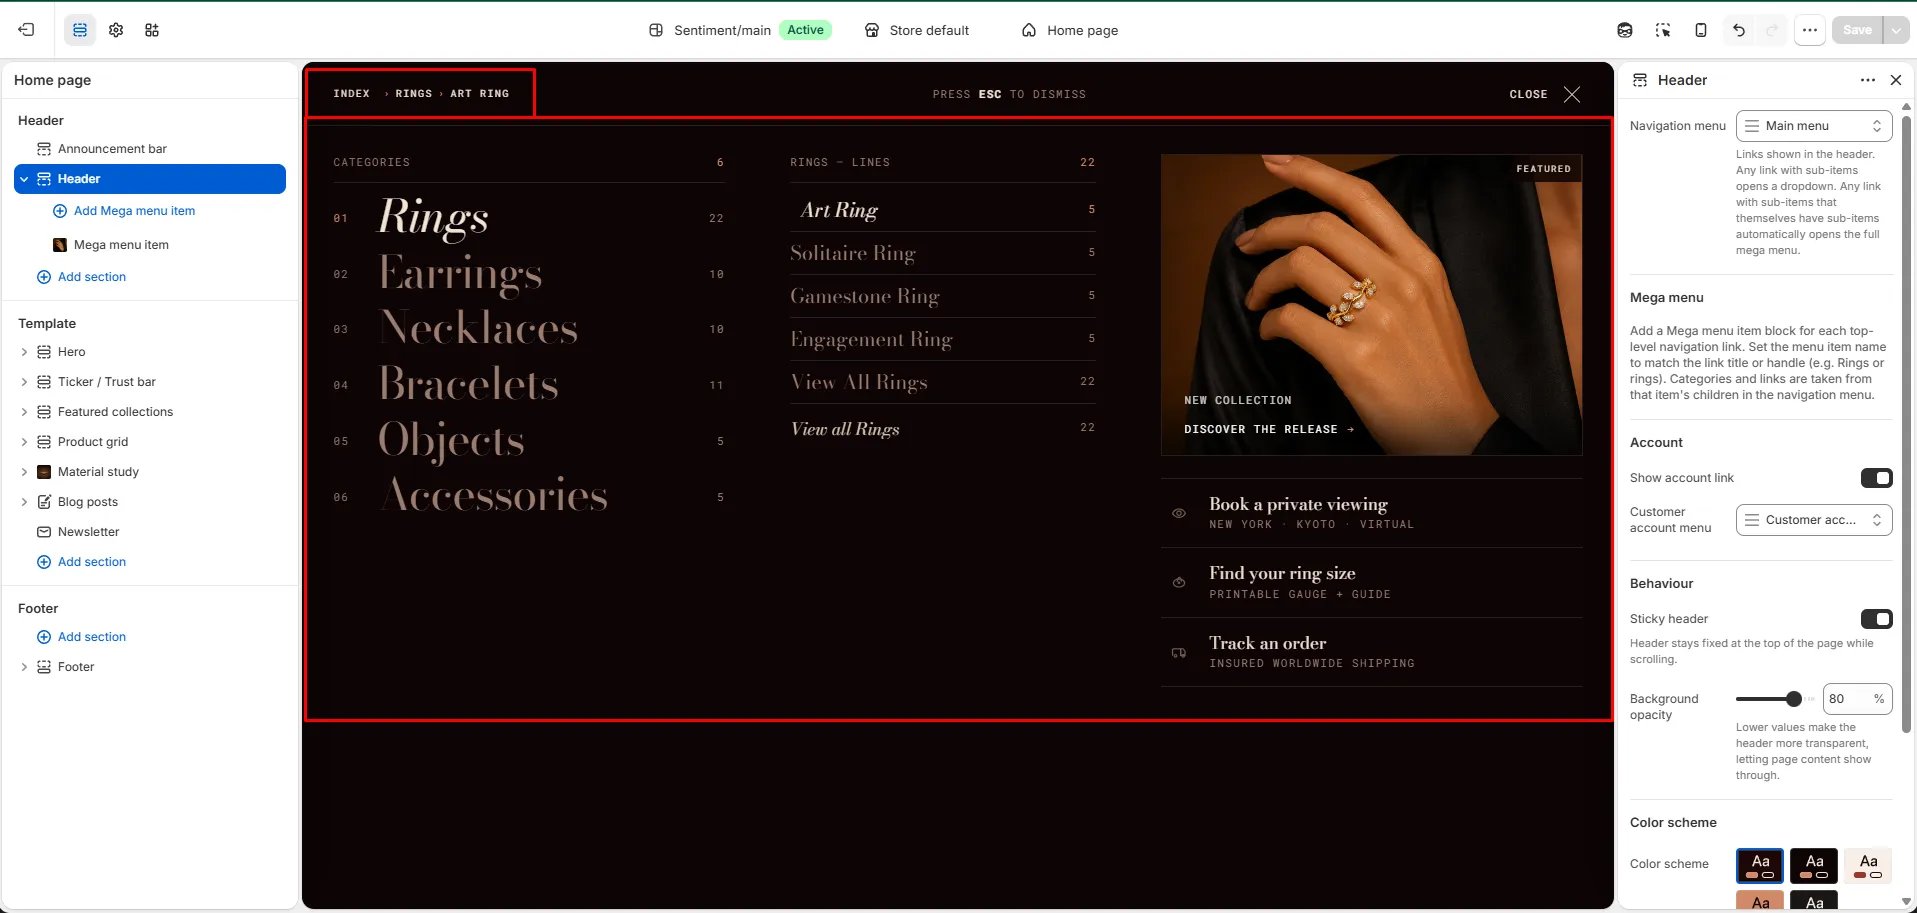
The mega menu is a wide, editorial navigation panel that displays your categories in numbered columns alongside featured links and a branded image panel. It gives customers a visual overview of your full catalog at a glance.
To enable the mega menu for a top-level navigation link, add a **Mega menu item** block in the theme editor for that link:
1. In the Theme Editor, click **Header** in the left sidebar.
2. Click **Add Mega menu item**.
3. Set the **Menu item name** to exactly match the top-level navigation link title or handle (e.g., `rings` for a link titled "Rings"). This is how the theme knows which menu item should trigger this mega menu.
4. Configure the Featured banner and Quick links for that item.
5. Click **Save**.
#### Mega Menu Item Settings
* **Color scheme:** Choose a color scheme specifically for this mega menu panel — useful for giving each category its own visual identity.
* **Menu item name:** Enter the exact title or handle of the top-level navigation link this mega menu should be attached to (e.g., `index`, `rings`, `necklaces`). This must match the link title or handle in your navigation menu.
#### Featured Banner
The featured banner appears on the right side of the mega menu panel, adding a visual highlight to the category.
* **Featured image:** Upload an image to display in the banner panel of the mega menu.
* **Featured label:** Add a small label above the heading (e.g., "New collection").
* **Featured heading:** Add a heading to overlay on the featured image.
* **Featured link:** Set the URL the banner links to when customers click it.
* **Button text:** Customize the label on the banner's call-to-action button (e.g., "Discover the release").
#### Quick Links
Quick links are service-style links displayed below the featured image in the mega menu — ideal for shortcuts like "Book a private viewing", "Find your ring size", or "Track an order".
***
### Mega Menu
The mega menu is a wide, editorial navigation panel that displays your categories in numbered columns alongside featured links and a branded image panel. It gives customers a visual overview of your full catalog at a glance.
To enable the mega menu for a top-level navigation link, add a **Mega menu item** block in the theme editor for that link:
1. In the Theme Editor, click **Header** in the left sidebar.
2. Click **Add Mega menu item**.
3. Set the **Menu item name** to exactly match the top-level navigation link title or handle (e.g., `rings` for a link titled "Rings"). This is how the theme knows which menu item should trigger this mega menu.
4. Configure the Featured banner and Quick links for that item.
5. Click **Save**.
#### Mega Menu Item Settings
* **Color scheme:** Choose a color scheme specifically for this mega menu panel — useful for giving each category its own visual identity.
* **Menu item name:** Enter the exact title or handle of the top-level navigation link this mega menu should be attached to (e.g., `index`, `rings`, `necklaces`). This must match the link title or handle in your navigation menu.
#### Featured Banner
The featured banner appears on the right side of the mega menu panel, adding a visual highlight to the category.
* **Featured image:** Upload an image to display in the banner panel of the mega menu.
* **Featured label:** Add a small label above the heading (e.g., "New collection").
* **Featured heading:** Add a heading to overlay on the featured image.
* **Featured link:** Set the URL the banner links to when customers click it.
* **Button text:** Customize the label on the banner's call-to-action button (e.g., "Discover the release").
#### Quick Links
Quick links are service-style links displayed below the featured image in the mega menu — ideal for shortcuts like "Book a private viewing", "Find your ring size", or "Track an order".